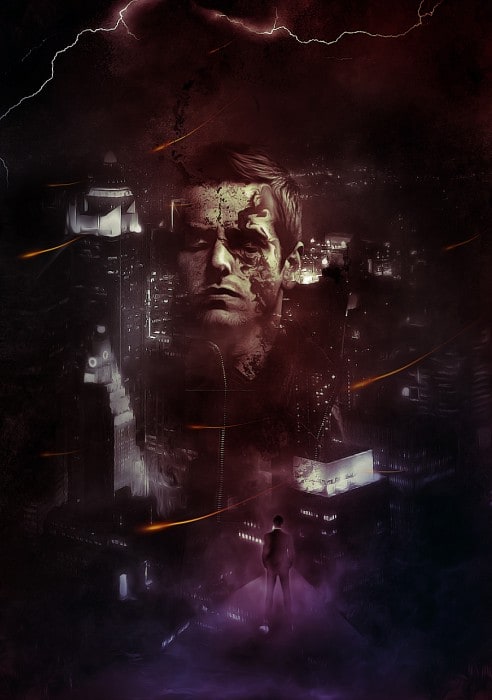
Exercise 18 [Create a Surreal Urban City Montage with Lightning Effect in Photoshop] by Chorn Samol
Along the way, we will practice mixing a series of photos and form a surreal, urban city scene with layer blending options and image adjustments, as well using various toolbox tools to adjust and fine-tune the image.
Here is a preview of the final effect I have for this tutorial: (click to enlarge)
Version 1
Version 2
Step 1
Create a new document sized 900px * 1278px with a black background, create a new layer and use a grunge brushset (you should be able to find lots of those on the net) and paint a background:
Hint: set the brush opacity and flow to around 30% so we can have subtle painting effect, use a soft eraser along the way to remove the area we don’t want.

Load the city image into Photoshop, select a piece as shown below:

Copy and paste the selection onto our document, resize and erase the edge as shown below:

Add the following adjustment layers as clipping mask to this city layer:
Black and white

Levels

On this levels layer mask, I used the soft eraser tool to remove some part of it to reveal the lighting behind it”
and here is the effect so far:

Step 2
We will now add the face into the image. Load the model face into Photoshop and cut out the face, resize and position it into the centre of the image:

Erase the edge of the face with a soft erase:

Then attach the following 2 adjustment layers as clipping mask to this face layer:
Black and white

Levels

Optional: you can add a bit grungy brush paint effect on the face to as some roughness on the image:

and here is the effect so far:

Step 3
We will now add a triangle platform on the bottom of the image and add a standing man on top of it. So let’s create a new layer and use the Pen Tool to draw a shape as below, and fill it with a light grey colour:

Apply the following Gradient Overlay blending option on this triangle layer:

Use a soft eraser to fade the bottom and the edge of this triangle to create some depth, also add some cloud around it:

Load the “man in suit” image into Photoshop and paste it over the platform as shown below:

Use a soft eraser to darken the lower half of his body as shown below:

Add the following 2 adjustment layers on this man standing layer:
Black and white

Levels

and here is the effect so far:

Step 4
We can add some cloud on the top of the canvas as shown below, either with a cloud brush or the cloud filter:
Now we will create some abstract flying lines – we will create a new layer and paint an orange dot:

Paint a smaller yellow dot in the centre as shown below:
Then merge those two layers, duplicate it, and apply the liquify filter on it as shown below on the duplicated layer:
Then we adjust the shape of the original dot layer with the distort tool:
Once you’re happy with the shape, merge those two layers again and use the free transform tool to adjust the shape:
Duplicate and scatter those lines around the image, rotate them and adjust the layer opacity as you see fit:

Step 5
Load the lightning image into Photoshop and select a portion of it with the Lasso Tool (30px feather):
Copy and paste the selection onto our document, and apply the black and white adjustment to this layer:

Set the blending mode of this layer to “Screen”, duplicate this layer once and move them to the top of the canvas:

and you will have the following effect so far:
We can add some colour effect to the image, and here is the final effect I have: (click to enlarge)
Version 1
Version 2
Exercise 18 [Create a Surreal Urban City Montage with Lightning Effect in Photoshop] by Chorn Samol
![Exercise 18 [Create a Surreal Urban City Montage with Lightning Effect in Photoshop] by Chorn Samol]() Reviewed by John
on
October 10, 2017
Rating:
Reviewed by John
on
October 10, 2017
Rating:


No comments